Practical 6: Pulse Width Modulation (PWM)
The Servomotor
A servomotor is a type of motor that is designed to control the rotational position of its shaft rather than it’s rotational speed (as is usually the case with DC motors). There are various types of servomotors but the most common type is the hobbyist servomotor, which is a small, low cost, and easy to use motor that is commonly used in robotics and other hobby projects. The hobbyist servomotor is typically a DC motor with a gearbox and a feedback mechanism that measures the position of its shaft. A small control circuit is used to drive the motor and read the feedback signal, which allows the motor to be precisely controlled. This controller also facilitates communication with the servomotor in order to send it position commands. This is shown in Figure 1 below.
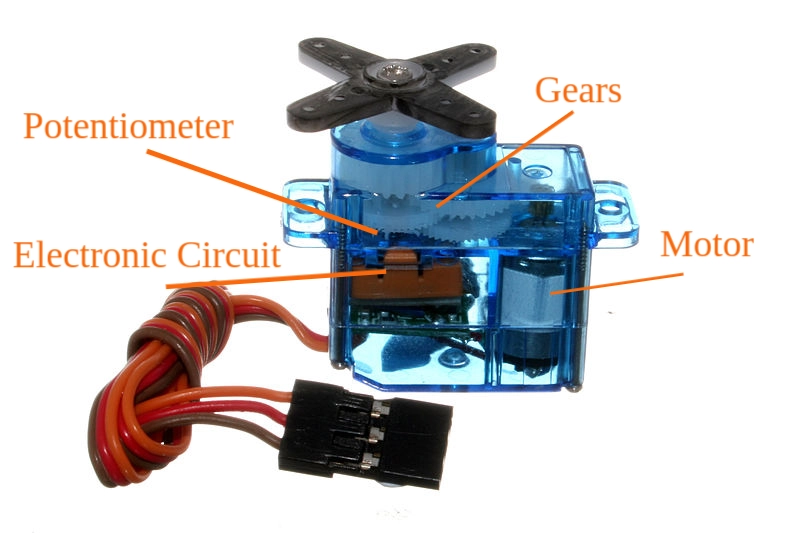 Figure 1: A labelled hobby servo motor. Image taken from here.)
Over the series of practicals in this course, you will build up a servo motor from its constituent parts, using a DC motor, a potentiometer to read the shaft position and an STM32 microcontroller to control the operation. Various analogue electronic circuits will be used to interface the microcontroller with the motor and potentiometer, and to control the power supplied to the motor. The figure below shows the hardware block diagram of the system.
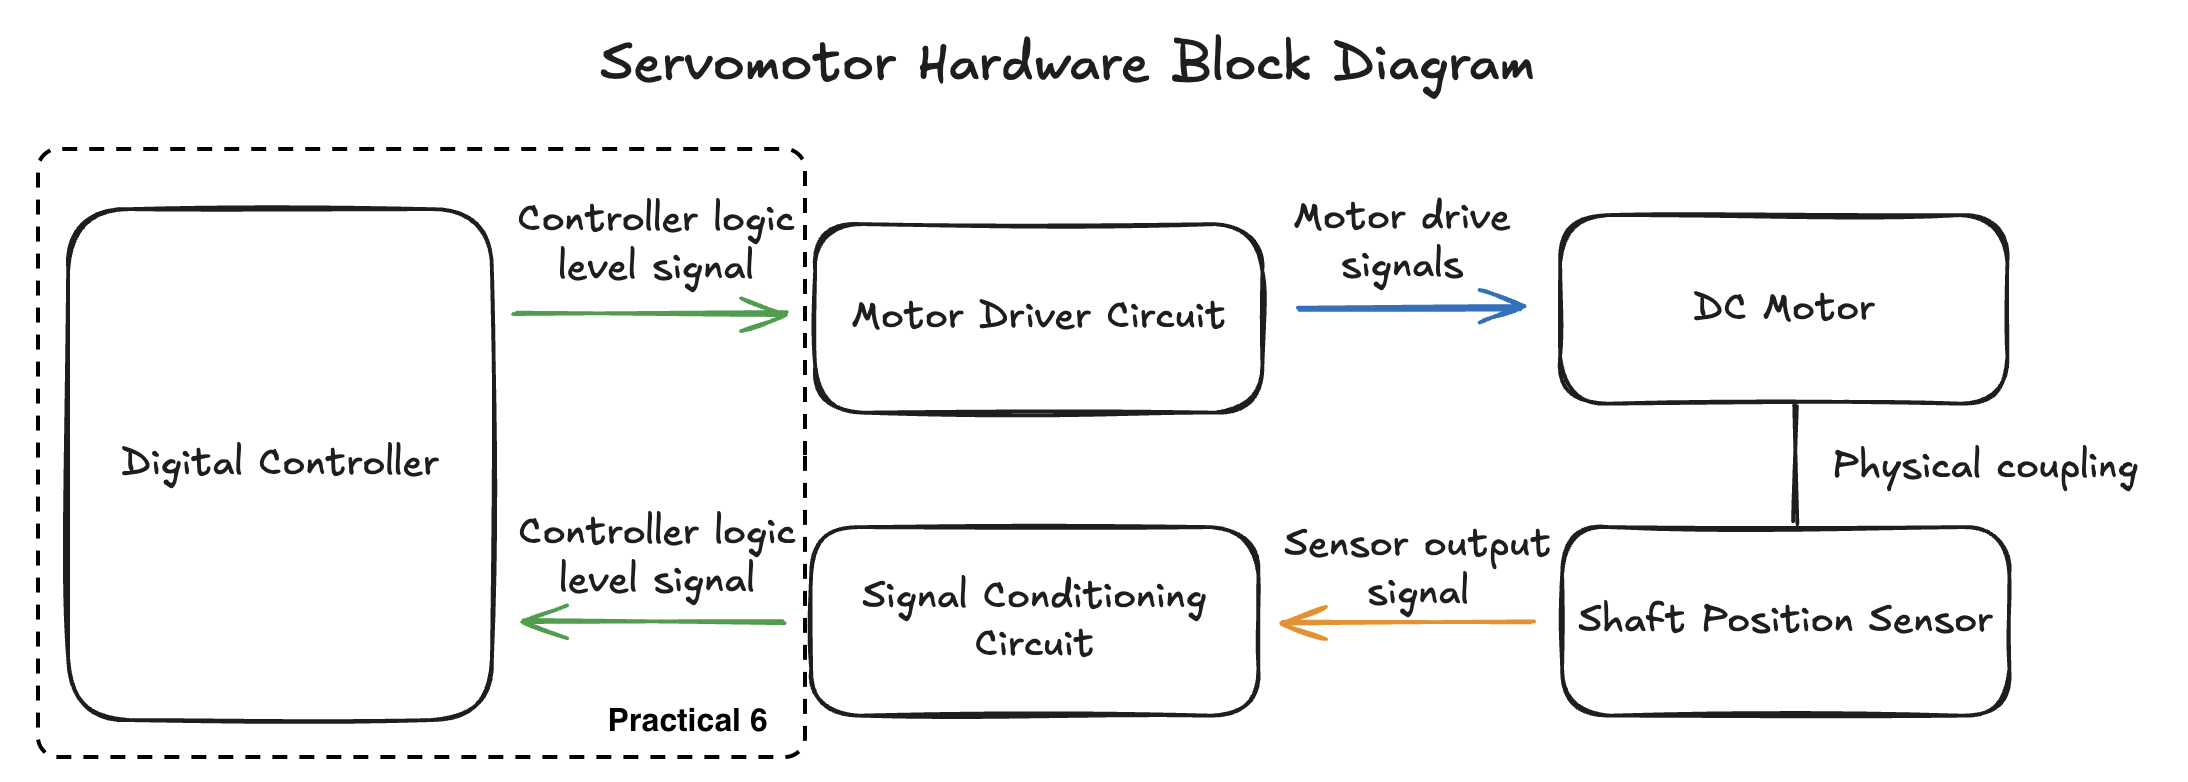 Figure 2: A block diagram representation of a servo motor.
In this practical we will extend your STM32 experience with the content you have learnt since the last practical and will test your ability to use the STM32FO51C6’s ADC and general purpose timers. The ADC will ultimately read the voltage from the potentiometer in the servomotor serving as the shaft position sensor, while timers will be used in generating the signals used to drive the DC motor. This practical will also show you how to use Git as a version control software.
Please use the feedback form to give us feedback on this practical and to report broken/faulty equipment.
Table of Contents
- The Servomotor
- Using Git and GitHub in This Practical
- Initial Commit
- Programming Questions
- Demonstration and Submission
- Marksheet
Using Git and GitHub in This Practical
Read the following guide before you start this practical. If you have used Git and GitHub before, you can skip ahead to Creating A Local Repository to see the repository and file naming convention, followed by Symbolic Linking and finally Submitting to Gradescope.
Git is a powerful, open-source, distributed version control system that tracks the version history of files. It is considered a de facto standard version control system in many institutions. It was originally written in 2005 by Linus Torvalds. Since Git is a distributed version control system, the entire repository is maintained on a local computer and all version tracking occurs on the same local computer. Git also allows for the synchronising of the local repository with a remote repository to allow developers to work collaboratively - this is where GitHub comes in.
GitHub is a proprietary developer platform that allows programmers to store and manage their code, and uses Git for distributed version control. It should not to be confused with Git - it is just a cloud storage solution for Git, and not the app itself. GitHub allows users to track bugs, provide access, manage tasks, create feature requests and create wikis for a project.
This practical will use Git and GitHub to introduce you to version control and to manage your submissions to Gradescope.
There are several softwares that can be used to manage a Git repository and each software has their own flavour of operation (see the official git website for a list of GUI clients). For simplicity, the following guide will use git and the GitHub Command Line Interface (CLI) commands to show basic usage of Git and how to set up a remote repository. You can also use GitHub desktop if you prefer, though this GUI adds a level of abstraction to the Git workflow.
If the text above seems complicated, here is a more basic explanation:
- Git is like a save system for your code — it lets you track changes, go back to old versions, and work on different features without messing things up.
- GitHub is a website where you can store your Git projects online and collaborate with others. That’s it! Git = version control. GitHub = online hosting + teamwork.
Installing Git
Use the following guide to install Git if you do not have it already:
Windows
The standalone Windows 64-bit executable can be downloaded here, the 32-bit executable can be downloaded here. Download the executable and run it as an administrator to install Git.
Alternatively you can follow the prompts to install Git from the Source Control tab in VS Code.
MacOS
Git can be installed on MacOS by using homebrew:
$ brew install git
or with MacPorts:
$ sudo port install git
Debian/Ubuntu
Git can be installed on a Debian or Ubuntu OS using apt:
$ sudo apt-get install git
Create a GitHub Account
Use your student email address to create a GitHub account, follow the instructions provided by GitHub and verify your email address.
Install GitHub CLI or Desktop
GitHub offers two methods to manage your remote repository on your local machine. The first is the GitHub Desktop Application, which is a GUI application that is best suited for Windows and Mac. The second method is the GitHub CLI, which is a command line application that allows you to manage your remote repositories and workflows.
This practical will make use of the CLI to demonstrate the command line usage of Git (the GUI hides Git commands with a layer of abstraction). Follow the installation instructions provided by GitHub for your OS (hint: for Windows, use winget or download the MSI file). Once you have installed the CLI, you will need to authenticate your device with GitHub. To complete this run the following command to start an interactive session to authenticate your device:
$ gh auth login
(This is a much better way of logging in than the alternative: personal access tokens are a mess)
Creating A Local Repository
With the above complete, you can create a local repository on your computer:
- In a location of your choice, create a directory with the name
SMTJHN001_MEC4126F_Practical_6(change SMTJHN001 to your student number). The following directory tree shows the repository setup: - Download the MEC4126F STM32 Programming Template for this and other C practicals. You can download it here. Copy entire contents of the template into your new directory. You should write your code in
src/main.c. - Open VS Code and in the PlatformIO tab, click on
Pick a folder. Then select yourSMTJHN001_MEC4126F_Practical_6directory to use it as the project directory for PlatformIO. - Initialize a new git repository in your directory using
git init.
Initial Commit
With git initialised and the directory set up, we can now commit these changes to the local repository. You can think of this like saving a version of the folder you just created. This version can then be reverted to later if you made a mistake somewhere! To see the status of the local repository you can run git status:
$ git status
On branch master

No commits yet

Untracked files:
  ...

nothing added to commit but untracked files present (use "git add" to track)
This means git is ready to save the files into a new isolated version (committed). The two local files can now be committed to the local repository with git commit.
- First, in the Source Control tab, add the files to the staging area (index) by clicking the
+icon next to the file names. You’ll see that there is an option to add all files. - Then type a descriptive message in the commit message box at the top of the Source Control tab.
- Finally, click the checkmark icon to commit the changes to the local repository.
Here we now have a local repository with one commit. This is not yet synchronised with GitHub and no remote repository exists.
Creating and Synchronising with A GitHub Remote Repository
A remote repository can now be created on GitHub. This will be a copy of your repository stored online, so you could work on your code on multiple computers, or share it with a colleague (however do not share your MEC4126F code with your friends). To do this we will use the GitHub CLI command gh repo create. This will launch an interactive CLI session that will help you create your remote repository, follow the onscreen prompts to create the remote repository. An example is as follows:
$ gh repo create
? What would you like to do? Push an existing local repository to GitHub
? Path to local repository .
? Repository name SMTJHN001_MEC4126F_Practical_6
? Repository owner TDR-Thomahawk
? Description "Practical 6"
? Visibility Private
✓ Created repository TDR-Thomahawk/SMTJHN001_MEC4126F_Practical_6 on GitHub
  https://GitHub.com/TDR-Thomahawk/SMTJHN001_MEC4126F_Practical_6
? Add a remote? Yes
? What should the new remote be called? origin
✓ Added remote https://GitHub.com/TDR-Thomahawk/SMTJHN001_MEC4126F_Practical_6.git
? Would you like to push commits from the current branch to "origin"? Yes
Enumerating objects: 4, done.
Counting objects: 100% (4/4), done.
Delta compression using up to 12 threads
Compressing objects: 100% (3/3), done.
Writing objects: 100% (4/4), 44.15 KiB | 8.83 MiB/s, done.
Total 4 (delta 0), reused 0 (delta 0), pack-reused 0
To https://GitHub.com/TDR-Thomahawk/SMTJHN001_MEC4126F_Practical_6.git
 * [new branch]      HEAD -> master
branch 'master' set up to track 'origin/master'.
✓ Pushed commits to https://GitHub.com/TDR-Thomahawk/SMTJHN001_MEC4126F_Practical_6.git
A remote repository now exists on GitHub. To synchronise your local repository to the remote repository use git push origin and to synchronise your remote repository to your local repository you use git pull origin. Check this by logging into GitHub and looking at your repositories.
The Usual Git Workflow
To summarize, the Git and GitHub workflow to save a version of your code that you want to stash online is as follows *(here we’re showing the git CLI commands but you can also do this in the GUI):
$ git add --all
$ git commit -m "Your unique message"
$ git push origin
You can also pull from the remote repository with:
$ git pull origin
You may also need to run git fetch before git pull if you have made changes on a different computer.
Points available = 2.
Programming Questions
This practical will require you to convert the voltage of the pin PA6 to an 8 bit integer and display this number on the LEDs connected to pins PB0 to PB7, if the switch SW0 has not been pressed. If the switch SW0 has been pressed, then the converted value of the voltage of pin PA6 will be used to control the duty cycle of a PWM signal outputted on pins PB0 and PB1. The following questions will guide you in the creation of the C code needed to achieve the above. The following flow chart summarises the requirements for this practical:
flowchart TD
    A[Start] --> B(Display Student Number on LCD)
    B --> C(Initialise ADC)
    C --> D(Start ADC)
    D --> E(Wait for ADC interrupt)
    E --> F(Display ADC Value on LEDs)
    F --> G{Has SW0 been pressed?}
    G --> |No| E
    G --> |Yes| H(Start PWM)
    H --> I(Output PWM to PB0 and PB1)
    I --> J(Wait for ADC interrupt)
    J --> K(Update PWM duty Cycle)
    K --> I
Each question is scored on tasks that are required to complete the question, see the Marksheet for further details of the grading of this practical. The mark scheme is intentionally vague: rather than giving a blow-by-blow for each question, you have to decide yourself what steps are necessary!
Question 1: Display Your Student Number on The LCD Display
After starting your STM32 dev board, display your student number on the LCD display with the function void init_student(void). Your student number should stay on the LCD screen for the entire operation of your code.
Points available = 1.
Question 2: Initialise ADC
Initialise your ADC so that it has the following configuration:
- Convert values from the
PA6Potentiometer - 8 bit continuous conversion
- Wait Mode
- Left Aligned
- Interrupt on end of conversion (EOC)
Place the code needed to initialise the ADC and GPIO in the function void init_ADC(void), make sure that you enable the ADC interrupt on the NVIC here as well.
Points available = 2.
Question 3: ADC Value on LEDs
When an ADC EOC interrupt is raised, read the value of the data register and adjust the data as necessary such that the bit representation of the converted value can be displayed on the LEDs PB0 to PB7. You will need to initialise GPIOB with a function void init_GPIOB(void). Make sure that the function void init_GPIOB(void) only contains the code necessary for this question. The reading and displaying of the converted value must occur in the interrupt handler function, i.e. void ADC1_COMP_IRQHandler(void).
Points available = 2.
Question 4: Test if SW0 has Been Pressed
Each time void ADC1_COMP_IRQHandler(void) is called, test whether the button SW0 has been pressed. If SW0 has been pressed, change the value of the global variable SW0_PRESSED from its initial value of False to True (do not use stdbool.h, rather use #define to replace True with 1 and False with0).
The button should only ever be pressed once in each invocation of your program. This means that once SW0_PRESSED has been set to True it should never set to False again, i.e. it has been latched. Use the function void init_GPIOA(void) to initialise GPIOA for this task and void ADC1_COMP_IRQHandler(void) to test whether the button has been pressed.
Points available = 3.
Question 5: If SW0 has Been Pressed
If SW0_PRESSED is True, then clear the ODR of GPIOB and set the mode GPIO pins from PB7 to PB2 to their reset state. Then call the function void init_TIM3(void) to setup and start the general purpose timer 3 to output a 10 kHz anti-phase PWM signal on PB0 and PB1 (i.e. when PB0 is high, PB1 is low). The duty cycle of the PWM signal will be set by the current converted ADC value, i.e. the value 255 relates to a 100% duty cycle and the value 0 relates to a 0% duty cycle.
Make sure that you still use void ADC1_COMP_IRQHandler(void) to update the PWM duty cycle with the current position of the potentiometer.
Points available = 3.
Demonstration and Submission
When you are ready to demonstrate, call over tutor. You will then be asked to run your C code on a UCT STM32 Dev board. The tutor will then assign a demonstration mark as described by the marksheet. The tutor will then ask a series of questions based on your submitted C code and ask to see your Git commit history on Github.
Marksheet
This practical has a maximum mark of 13. The marks for each question can be seen in the question. This scheme is intentionally vague: rather than giving a blow-by-blow for each question, you have to decide yourself what steps are necessary!